Halloween has come to an end, and it’s now time to wrap up the spooky season. After enjoying the festivities, you may be faced with the task of cleaning up and removing stains. As you put away the decorations, you might be asking yourself “What do I do with my Halloween costume?“. In this guide, we’ll list out things to avoid when cleaning Halloween costumes.
For all of you who’ve been scratching your heads for months, trying to figure out what to wear on Halloween, to really stand out on the 31st of October, we’ve got your back. We’ve compiled a list of Halloween costume ideas to give you the burst of inspiration you’ve been looking for!
As Halloween draws near, the thrill of selecting the ideal costume kicks in. Whether you’re planning to morph into a spooky vampire, a wicked witch, or your favourite superhero, there’s a common thing that frightens everyone; laundry. After Halloween, costumes can be stained with food, drink, fake blood, and other mischief-related marks. If you’re a parent, this challenge gets bigger. But don’t let that spook you! We have a few Halloween laundry tricks up our sleeves to ensure that your kids’ Halloween costumes stay fresh.
Halloween day is here! The spooky decorations are up, and the delicious cookies are baked. While it is an exciting day for the family and especially the kids, there are still some scary stains that lurk on costumes and clothes. To avoid a laundry nightmare, here is our guide to removing common Halloween stains.
1. Chocolate
Who doesn’t love chocolate? It’s delicious but as far as Halloween stains go, they can be devilishly stubborn to remove. It’s important you have the patience of an angel and treat the chocolate stains with care and caution.
The first step in removing chocolate stains is to immediately treat them with a butter knife and rinse your garment with cold water so it doesn’t spread across the fabric.
Lastly, pour liquid detergent into the chocolate stain and after 5 minutes, soak the garment for 15 minutes in cold water and start to rub the stained area.
It wouldn’t be Halloween without Pumpkins but unfortunately, pumpkins are common Halloween stains. Although they look frightening, the good news is that they are easy to remove.
To remove them, inspect your garment closely and remove any pumpkin bits. After you’ve done that, wash them under cold water. Then pre-treat the stain with a laundry detergent and let it sit for 5 minutes. Finally, begin your laundry cycle.
Fake blood looks scary on the kids’ faces as it does when it drops on their costumes, clothes or even on the sofa! Because it’s made of syrup and dye, it can be a stubborn stain to tackle on Halloween.
Your best bet when removing fake blood stains is to apply white vinegar and put it in water overnight before returning to it the next day to wash it with detergent.
4. Drink Stains
If you’re hosting a Halloween party, one of the most common drinks is fruit punches (for the kids). You shouldn’t worry if your kids do make a mess and spill this drink on their clothes because the stains are easy to remove. All you need do is rinse the stained area with cold water and then wash it at 40 degrees.
Removing these common Halloween stains will be inevitable but don’t let them stop you from having a grand time with your family! Happy trick-or-treating!
A friendly reminder that if you need help, Laundryheap offers laundry services to tackle those stains for you and within 24 hours, we’ll bring your clothes back as good as new!
Spooky season is well and truly upon us! Whether you’re trick or treating or scaring yourself with a horror movie, Halloween is an exciting time. For parents, it can be overwhelming with all the planning. Just the thought of shopping for costumes, baking Halloween cookies and decorating the house can be haunting to hear! To lift your spirits, we’re here to help you out! Here is how to prepare for Halloween!
1. Get The Kids Involved
Kids love sweets and chocolates on Halloween (and we don’t blame them!) but if you want to prepare for Halloween, you should get the kids involved in decorating the house. Kids are creative and no doubt will have fun coming up with ideas to create a scary atmosphere at your house.
In addition, you should use Halloween as a time to introduce your kids to baking. If your Halloween plans include staying in and watching a scary horror with the family, then why not enjoy the night with homemade Halloween cookies? It’s sure to be a scream!
Don’t forget the pumpkins! It wouldn’t be Halloween without them. Ask your kids to carve the Pumpkins so they can truly show their artistic side and add an extra spooky vibe to your house!
Preparing for Halloween costumes requires time and patience but if you leave your Halloween shopping to the last day, you’ll be rushing and miss out on the best deals.
Ask your kids what costumes they like to wear and buy them as soon as they’ve made their decision.
We do recommend the idea of renting costumes as it can save you more money rather than buying them.
Even if you don’t plan on going out and prefer a nice cosy night inside, you’ll still get the chance to interact with the trick-or-treaters! You don’t want to scare the trick-or-treaters away by telling them you have no treats. Make sure you at least have a bucket of sweets that you can hand out to them!
Halloween is a time that the whole community gets involved so make an impression on the neighbourhood by stacking up pumpkins, spider webs and other scary Halloween decorations!
4. Don’t Ghost Your Laundry Duties
It’s tempting to tell yourself ‘I’ll do the laundry later’, especially when you have a whole week to prepare for Halloween. However, with our laundry services, you no longer have to ghost your laundry duties!
That’s right, Laundryheap is here to take care of your laundry so you can focus on spending the week preparing for Halloween.
All you need to do is book a service with us and we’ll collect your dirty laundry within a day. Once cleaned, it will be returned to your house within 24 hours!
Halloween is almost upon us and if you haven’t got your outfit sorted don’t panic. These 4 DIY costumes are easy to make and perfect for a Halloween full of thrills and chills.
Ghost
Skeleton
Strawberry
Zombie bride
Ghost
Let’s start easy. A ghost costume is incredibly easy to achieve, very comfortable, and requires limited supplies.
To make a ghost costume you will need…
A white sheet
Scissors
Light coloured hat
Pen or pencil
Safety pins
Black marker
To begin making your ghost costume place your light coloured hat on your head. If your hat has a brim you must either cut it off or wear your hat backwards so that it doesn’t get in the way.
Next, drape your white sheet over your head so that it’s laying evenly over your body. If your sheet is slightly too long, get a friend to use a pen to mark the excess fabric to a comfortable length. Whilst you are still wearing the sheet, get your friend to mark where the top of your head is, and use your fingers to demonstrate where your eyes are, marking them as well.
Once the appropriate areas have been marked, take your sheet off. Use one safety pin to attach your hat to your sheet using the mark in the centre of the head. Use your remaining safety pins to make sure that the hat is secured to the sheet.
With your scissors cut eye holes where they were marked. Once you have cut your eye holes, use your black marker to draw around them, making them more defined. You can also use your black maker to draw a nose and mouth if you wish.
Finally, use your scissors to cut the excess fabric at the bottom of the sheet. For a more ghoulishly looking ghost, cut your fabric in a haphazard manner rather than in a straight line. You are now ready to put your costume on and enjoy a day of tricks and lots of treats.
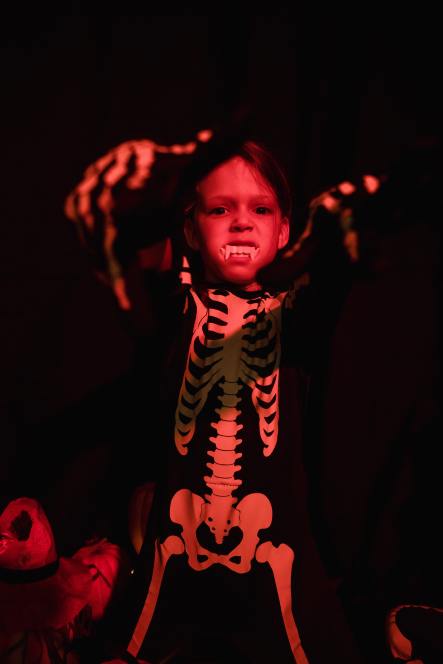
If you are looking for a costume with a bit more body to it, why not go as a skeleton?
To make a skeleton costume you will need…
White masking tape
Black clothing to cover your top and bottom half
To begin making your skeleton costume lay out your black clothing on a flat surface. Make sure that your clothes are adequately spread out so that you can see the whole garment.
Create your skeleton by tearing off strips of masking tape of various lengths and sticking them to your black clothes. Your skeleton doesn’t have to be accurate, so don’t worry too much about getting the lengths and placement of the tape right. Make sure that you have covered the general areas, such as your arms, legs, and torso, before putting your costume on.
To add to your slinky skeleton look you can paint your face to look like a skeleton using black and white face paint. Alternatively, you can print out a mask of a skeleton for an equally frightening look.
Halloween costumes don’t always have to be scary. Go as something sweeter, and easy to make, like a strawberry.
To make a strawberry costume you will need…
Red clothing, ideally a dress
White felt
Long cylinder can (a crisp can will do)
Green cardboard
Pencil
A stretchy headband
Scissors
Hot glue gun
To begin making your strawberry costume, use your scissors to cut out lots of small teardrop shapes from your white felt. To make this step faster, layer 2 or 3 sheets of felt and cut through them at the same time. These teardrop shapes will be the seeds of your strawberry.
Once you have finished cutting out your shapes, lay out your red clothing on a flat surface, making sure that you can see the whole garment. Using a hot glue gun, glue your felt shapes to your red clothing in a random pattern, making sure that your whole garment is covered. Once you have glued your white felt down, set your red clothing to one side to dry.
Whilst your clothing is drying, you can make your leafy headpiece. To begin creating your headpiece use a pencil to trace the shape of 2 different sized leaves on your green cardboard. Ideally you want 4 large leaves and 5 or 6 slightly smaller leaves. Once you have drawn all of your leaves, use your scissors to cut them out. To make your strawberry leaves look more realistic, use your fingers to gently pinch the base of each leaf and slide your fingers up to the tip. This will create a gentle curl.
Your can will be the base of your hat, so make sure that it is a comfortable height to place on your head. Use your glue gun to glue the biggest leaves around the can. Next, use the second biggest leaves to fill in the gaps in between the big leaves, making sure that you can no longer see the can. To finish off your headpiece, stick your headband to your can by making a line of hot glue at the base of your can.
Once your headband is secured you can shimmy your strawberry outfit on, and top it off with your leafy headpiece for more of a treat than a trick.
We’ve all heard of bridezilla, well this costume is bridezilla if she were dead. Luckily, this outfit is a lot easier to put together than a wedding, so hopefully there won’t be any meltdowns.
To make a zombie bride costume you will need…
A white dress
White veil (not essential but a nice touch)
Moisturiser
Light shade of foundation
White powder
Light blue eyeshadow
Smokey eye eyeshadow palette
Black pencil eyeliner
Black mascara
A zombie bride look is less about the outfit and more about the makeup. That being said, to achieve the bridal look you will need a white dress and a veil. To make your zombie look really come to life, cover your dress in black makeup or any product that will make it look dirty. You may also want to tear the bottom of your dress to zombiefy it.
To make your zombie bride come alive, begin by smoothing moisturiser into your face. Add the lightest shade of foundation that you can find on top of your moisturiser, blending it in until smooth. Once smooth, add white powder to your face, giving yourself a very pale complexion. To add to the undead look, blend a light blue eyeshadow into your makeup, giving your skin a blueish grey tone.
Next, use a smokey eye eyeshadow palette to add colour to your eyes, cheeks, and forehead. Use a combination of purple, pink, red, and black eyeshadow underneath your eyes to make dark circles, making sure to blend the colours together with a brush. Use a black eyeshadow to highlight your cheekbones and wrinkles on your forehead, blending the lines slightly to give you a more dead-like look.
With a black pencil eyeliner, heavily line the lids of your eyes, using your fingers to smudge the eyeliner into your skin. For added effect, use the eyeliner on your lashline, smudging that as well. This will create the effect of sunken eyes.
Finally, finish the look by applying a heavy amount of mascara to your bottom lashes. Use your mascara brush to clump some of your lashes together, in a messy, haphazard way.
With your dress on and makeup done, you are ready to head out into the world to find your groom… dead or alive.
At Laundryheap there are no tricks, only treats. Whilst you have fun creating mischief on Halloween, we will pick-up, launder, and redeliver your clothing to you. Simply head to the Laundryheap website or download the free Laundryheap app to book your order today.